Welcome to Nutrition
New Year, New You | Week 2
Week 2
Overcome Your Excuses
My favorite exercise is between a lunge and a crunch… I call it ‘lunch’
~ the hungry runner
For performance-driven athletes, lunch is an important time to refuel after a busy morning or to fuel up for an afternoon training session. Eating the wrong thing or skipping lunch entirely can easily lead to problems for runners: inadequate calorie replacement; reduced training adaptations, poor quality afternoon exercise bouts; ravenous hunger and cravings for sweets, and weight gain due to overcompensating in the evening.
Getting up and out of the house for early morning runs or making that 7 am meeting is hard enough as it is. Add the thought of making a healthy, filling lunch to bring to work, and you’re probably already waiting in line at the closest restaurant for lunch.
While buying a lunch every now and then is not a cause for concern, over time, eating these meals every day of the week can have an effect on your performance, waistline, energy levels and overall health — and your bank balance, too.
A healthy lunch provides our brains with the low GI energy source they need to function properly. The right lunch actually helps curb our hunger levels and helps fuel us through the latter part of the day.
Making and bringing lunch to work every day might seem as impossible as licking your elbow, but we promise it can be easy, and the benefits far outweigh the initial hassle.
You have three choices for healthier lunches: prep and package your midday meals over the weekend so you can just grab-and-go every weekday morning; double your dinner recipe so you’ll have automatic leftovers for lunch the next day, or get up a little earlier and pack it all in the morning. The choice is yours and entirely depends on your personality and schedule.
Monday – Mason Jar Monday
Tuesday – To-Go Box Tuesday (Bento Boxes)
Wednesday – Wrap It Up Wednesday
Thursday – Leftovers’ Salad
Friday – Buddha Bowl (aka mix healthy stuff together in a big bowl)
Select An Area To Focus On

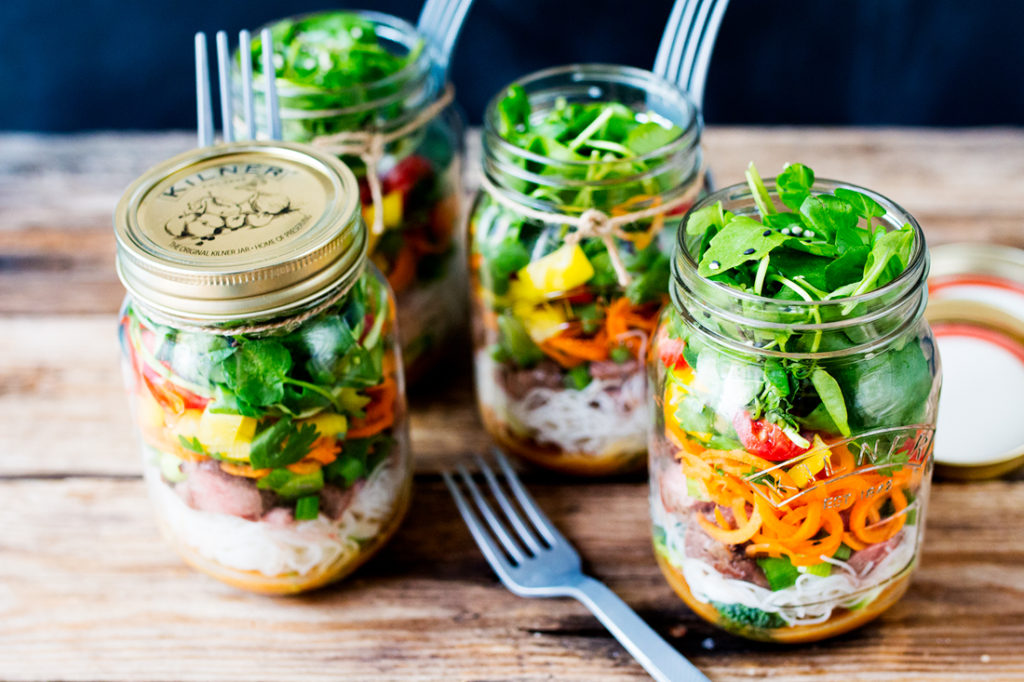
Mason Jar Recipes
- How-To's

I absolutely love salads and I would say that unless I am having some leftovers for lunch, a good old bowl of crunchy vegetables with some tasty meat or fish and a yummy homemade salad dressing is my usual go-to option. I want to share some of my favorite healthy salad recipes that you can pack layered in a mason jar to take to the office or on a trip.
First of all, I find that salads in a jar are a pretty cool way to avoid using plastic and to recycle all those leftover glass jars you have lying around the kitchen. I soak my jars in really hot water and peel off the labels before storing them in the cupboard. I then use them to store leftovers, sauces, coconut milk, salad dressings and packed lunches.
When it comes to salad combinations, the sky is the limit. I often make a big batch of salad dressing so I can keep it in the fridge at work for lunches or at home for quick dinners.
Layering suggestions – I’ve experimented with salad leaves on top and bottom of the jar and I find that they are best when kept on top as well as any other ingredients you don’t want to squash too much or that might give out too much juice. The size of the jar is up to you but mine holds about 500-600 grams of food… basically the biggest ones you can buy.
All recipes are for 1 servings, with some dressing leftovers.
- Sardines & Celeriac With Chunky Avocado Dressing
1 zucchini, spiralized
1-2 tbsp lemon juice
1/3 c cooked amaranth (can sub any grain)
1/4 c walnuts
1 can / 3.5 oz sardines w/ bones
2-3 tbsp chopped green onions
1/2 medium yellow or red pepper, diced
1 cup arugula salad
For the dressing
1/4 avocado
4-5 sun-dried tomatoes, chopped
6 tbsp extra-virgin olive oil
2 tbsp apple cider vinegar or white wine vinegar
1 tbsp lemon juice
Generous pinch of sea salt
1/4 tsp hot English mustard
Drizzle the zucchini with lemon juice to prevent discoloration. To make the dressing, place all ingredients in a food processor and puree into a coarse mixture. Pack salad ingredients in a mason jar, dressing on the bottom, then veggies, then sardines, then greens, grain and seeds at the top.
Notes
Look for sardines canned in brine or olive oil; avoid canola or soybean oil.
You can use grated carrot, kohlrabi or shredded cabbage instead of zucchini.
If making the night before, store the dressing in an airtight container in the fridge. You should have enough for a couple of servings. Dijon mustard can be used instead of hot mustard.
- Moroccan Chicken & Avocado With Lime & Chili Dressing
1/2 small shallot, sliced
1/2 tsp coconut oil or ghee
Pinch of sea salt
1 chicken breast, sliced into 4-5 strips
1/2 tsp mild paprika
1/4 tsp turmeric powder
1/2 tsp cumin powder
1/2 tsp garlic powder
1/2 tsp sea salt + black pepper
1 tsp coconut oil
2 cups baby spinach or other leafy greens
1 small apple diced
5 cherry tomatoes, sliced or whole
1/2 cup diced cucumber
1/2 avocado, diced
Drizzle of lime juice
For the dressing
1/2 tsp liquid stevia or molasses
Zest of 1/2 medium lime
Juice of 1/2 medium lime
2-3 tbsp extra-virgin olive oil
4-5 slices of long red chili (can sub 1/2 tsp cayenne pepper)
Pinch of sea salt
Rub the chicken strips with spices, salt, and pepper and pan-fry in coconut oil over medium-high heat for 4 minutes each side. Rest to cool before packing with the other salad ingredients in a mason jar. Premix the dressing and store in a separate container.
- Mexican Prawns & Tomato Salsa Salad
**Frozen prawns can be used instead of raw after defrosting. Pre-cooked, store-bought shrimp is also fine, you can simply reheat it with the spices.**
1 tsp coconut oil
5-6 raw king prawns (peeled and deveined, 2 garlic cloves, finely diced
1/3 cup black beans
2 cups romaine, chopped
1/2 tsp red chili flakes or powder
1/2 tsp sweet paprika
1/2 tsp cumin powder
1/2 tsp sea salt
Optional addition: jalapeños
For the tomato salsa
1/2 cup diced tomatoes (about 2 small tomatoes)
2 tbsp chopped fresh coriander (cilantro)
1/4 red onion, finely diced
Juice of 1/2 lime juice
2 tbsp extra-virgin olive oil
1/2 tsp sea salt
Pinch of coriander seed powder (optional)
1/2 avocado, diced
1/4 lime + extra coriander to garnish
Heat coconut oil in a large frying pan. Toss the prawns with garlic, spices and sea salt. Pan-fry for 2-3 minutes, stirring a couple of times. Set aside to cool before packing the salad. If cooking pre-cooked prawns, just warm them up with garlic and spices for a minute.
Combine the salsa ingredients and place on the bottom of the jar, followed by prawns, beans, lettuce, and avocado. Place the extra lime and coriander on top.
- Grilled Vegetables With Almonds & Balsamic (Plant Based)
You can grill or roast a larger batch of the listed vegetables to use up in more salads or as a side with another meal.
Herbs such as thyme, rosemary, oregano or sage are nice for this recipe.
For roasted red peppers, I used a pre-bought stuff that comes in a glass jar.
2 tsp coconut oil or ghee
1 shallot, sliced thick
1/4 cauliflower head, broken into florets
1/2 cup diced sweet potato or pumpkin
2 garlic cloves, diced
2/3 tsp sea salt
2/3 tsp dried herbs of choice (see notes)
2 cups baby spinach or other green leafy salad
2 tbsp hemp seeds
1/3 c roasted red pepper, sliced (see notes)
2 tbsp almond flakes or slivers
1 tbsp balsamic vinegar
2 tbsp extra-virgin olive oil
You can either roast or grill the vegetables for this salad. To roast, place the cauliflower, sweet potato (or pumpkin) and onion with whole garlic cloves in a roasting tray with some melted coconut oil or dollops of ghee. Sprinkle with sea salt and dried herbs, and roast for 20-25 minutes at 400 °F.
To grill, heat the coconut oil or ghee in a large frying pan over medium-high heat. Add the onion, cauliflower, and sweet potato and pan-fry for about 10 minutes, stirring occasionally. I cover the pan with a lid for half of the time to speed up the cooking process. Towards the end, add the diced garlic, dried herbs, and sea salt and cook for 2 more minutes. Add the almonds to the grilled vegetables. Slice the red pepper and pack in a jar together with hemp seeds and some leafy greens. Pack the balsamic and olive oil in a separate container.
- Wild Salmon With Creamy Dressing
You can use canned or freshly cooked salmon or tuna.
1 can wild salmon
2 cups mixed greens
1/2 carrot, diced
1/2 small red pepper, diced
1/2 small cucumber, sliced
1 small celery stick, sliced
2 tbsp chopped green onions
1/3 cup blueberries
1/2 avocado, sliced
Thick slice of lemon
For the dressing
1 tbsp hummus (you can just smash the chickpeas with a fork and stir with a drizzle of olive oil to make your own)
1 + 1/2 tbsp extra-virgin olive oil
1/2 tsp sea salt
sprinkle lemon pepper
1 tbsp lemon juice
This one is pretty straight-forward. Mix the dressing and pack all ingredients in a mason jar. Done
- Crunchy Asian Salad (Plant Based)
1/2 c Shredded cabbage
1/3 Diced red bell pepper
1/2 c Chopped broccoli florets
1/4 c Shredded carrots
1/2 c Shelled edamame
Handful Chopped unsalted peanuts
Optional
Sliced green onions
Romaine lettuce
For the dressing
1 tablespoon peanut butter
1 tablespoon organic soy sauce
1/2 teaspoon Sriracha hot sauce
Mix the dressing and pour it in the bottom of the jar. Then add ingredients in order of appearance above. Shake and enjoy.
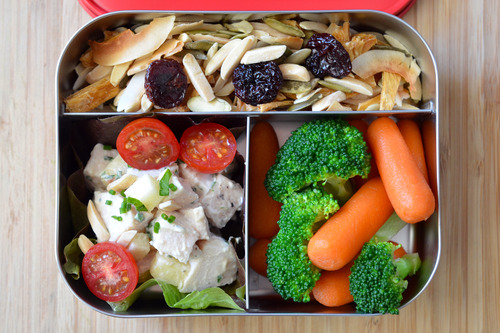
Boxed Up Lunches
- Box Basics

We all know that lunches can get tricky when you’re trying to eat healthily. With sandwiches being out of the question (this month), it’s easy to start thinking that the options are very limited, but it doesn’t have to be like that. Using bento boxes makes it easy to pack fun, tasty and varied lunch options that can be enjoyed cold. They are good for all kinds of salads, leftover cooked meats, dips, condiments, roasted or raw vegetables, fruits, … and they help to keep your portions under control.
I like to use the non-reactive stainless steel ones, however, you can use any large glass Tupperware container. They are great for kids and adults alike and bound to make your coworkers jealous of your healthy lifestyle. Bring more than one if you have a large appetite or on very active days and try to keep them refrigerated when out for extended periods of time.
- Tips & Tricks
- Plan ahead – keep in mind you want all macronutrients included in your box (fat, protein, carbohydrate).
- Finger foods or bite-sized pieces are best and easy to eat.
- Pack only foods that can be eaten cold or room temperature. This isn’t a ‘leftover’ reheated meal. The idea is to be able to take it with you anywhere and eat without needing a kitchen.
- Give yourself variety- in colors, flavors, and foods. Add in a little bit of this and a little bit of that to make a complete meal.
- Pack your veggies first! Give the most ‘real estate’ to super-healthy veggies and then fill in with fruits, meat/beans, starches, and fats.
- Utensils – don’t forget to pack a fork, chopsticks, a spoon… I just keep a set in my bag.
- Sauce Containers can help with dressings and dips.
- Pack the foods tightly to prevent them from slipping around.
- Keep dry foods dry and separate to keep them from getting soggy or spoiling.
- Make it FUN! Challenge your coworkers to see who can come up with the most creative and visually appealing lunch. Bento Boxes are traditionally about beauty and presentation… bonus points if you can make a ‘The Run Experience’ themed box!!
- Bento-Box Recipe Ideas
Here are 6 lunch ideas in bento boxes to help inspire you:
- Grilled (or canned) salmon with fresh dill and lemon slices, radishes, walnuts, and kiwi slices
- Grilled chicken with kale and blueberry salad, pistachio nuts, cherry tomatoes and roasted sweet potatoes
- Mini grass-fed beef burgers with olives, red bell pepper and applesauce (make your own by mashing up an apple and adding cinnamon
- Hard-boiled eggs, guacamole, salsa, black beans, yellow bell pepper slices, and blackberries
- Chicken-Spinach salad (made with hummus instead of mayo), cucumber, fresh pineapple or unsweetened dried apricots and pumpkin seeds.
- Sardines with lemon and cucumber, cooked quinoa, almonds, sliced apple with almond butter
Bento Box Lunches
- What Are They?
We all know that lunches can get tricky when you’re trying to eat healthily. With sandwiches being out of the question (this month), it’s easy to start thinking that the options are very limited, but it doesn’t have to be like that.
Using bento boxes makes it easy to pack fun, tasty and varied lunch options that can be enjoyed cold. They are good for all kinds of salads, leftover cooked meats, dips, condiments, roasted or raw vegetables, fruits, … and they help to keep your portions under control.
I like to use the non-reactive stainless steel ones. They are great for kids and adults alike and bound to make your coworkers jealous of your healthy lifestyle. Bring more than one if you have a large appetite or on very active days and try to keep them refrigerated when out for extended periods of time.
- Recipe Ideas
Here are 6 lunch ideas in bento boxes to help you get inspired when making your own lunches:
- Grilled (or canned) salmon with fresh dill and lemon slices, radishes, walnuts, and kiwi slices
- Grilled chicken with kale and blueberry salad, pistachio nuts, cherry tomatoes and roasted sweet potatoes
- Mini grass-fed beef burgers with olives, red bell pepper and applesauce (make your own by mashing up an apple and adding cinnamon
- Hard-boiled eggs, guacamole, salsa, black beans, yellow bell pepper slices, and blackberries
- Chicken spinach salad (made with hummus instead of mayo), cucumber, fresh pineapple or unsweetened dried apricots and pumpkin seeds.
- Sardines with lemon and cucumber, cooked quinoa, almonds, sliced apple with almond butter
Wrap It Up Wednesday
- Why the Wrap?

Who doesn’t love a burrito? Its like finger food for adults. You can throw just about anything in there and dive in with both hands. Meals can be hot or cold and are quite portable if you need to eat in a hurry. Sandwiches can be a great lunch option (or a very bad one) but this month is all about trying new things. You’ll likely save some money in the long run too.
- Wrap Guidelines
- Go GREEN – the best option is to choose thick, large greens to use as a wrap. Collard, Chard, and Mustard are my favorites. Romaine and Butter lettuce also work but are a bit thinner so you can’t fill them up with more liquid/runny stuff quite as well.
- If you want a more traditional option you can make your own wrap – called socca. Socca is a fab, naturally gluten-free recipe that uses chickpea flour and cooks up in a matter of minutes.
I love socca because the base has only 3 ingredients and you can top it or fill it with whatever you’re in the mood for! Craving a lil’ bit of spice? Layer on hot salsa with your favorite veggies! Feeling farmers market fresh? Bake up some root veggies and top with a dollop of guac.
Recipe:
Ingredients (makes 8 mini ‘tortillas’)2 1/4 cups chickpea flour
2 cups water
1 1/2 Tbsp Olive Oil
Coconut Oil Spray for cooking.
DIRECTIONS
STEP 1: Whisk together all ingredients in a large bowl. Make sure there aren’t any clumps!
STEP 2: Spray a cast iron skillet or pan (we prefer a cast iron skillet, but you can use a pan if you don’t have one on hand!) with coconut oil. Heat over medium-high heat. Once the pan is hot, add in 3 Tbsp. of batter. #TRETip- If you’re using a cast iron skillet, make sure to not grab the handle without an oven mitt! The entire pan will be very hot!
STEP 3: Heat on one side for 2-3 minutes then flip over using a spatula and cook for 1 more minute. Remove from heat and transfer to a plate. Continue this process until you’ve run out of batter.
STEP 4: From here you can top your socca! Use our recommended toppings or get creative and make your own!
- Benefits Of The Green Wrap
Benefits of ‘Green-Wrapping’ up your lunch:
- It’s a healthier option than some kinds of bread – If you use greens like collard or chard to wrap your food you will get a big nutrient boost with added vitamins, minerals and fiber. You will be consuming less processed ingredients, less wasted calories, and less sodium and sugar.
- You’ll end up eating less of things like mayonnaise and more of things like veggies or healthy fats.
- You’ll avoid the inevitable sugar crash that comes after chowing down on a huge hoagie from the deli.
- You’ll be more likely to try new ingredients instead of sticking to your regular menu of tomato soup and a grilled cheese.
- You are in charge of the ingredients. Everything going into your wrap can be specifically selected to meet your individual nutritional needs.
- You can make several ‘mini’ wraps to snack on throughout the day if you prefer smaller meals.
- Recipe Suggestions
All tasty options that will fill you with vitamins, minerals, fiber and healthy fat.
- Slow Cooker Carnitas Lettuce Wraps – throw a bone-in pork shoulder into the crockpot with onion, seasonings, juice of an orange and some water and let it cook overnight. In the morning, shred the pork and prepare a nice avocado, cucumber, pineapple salsa to put on top.
- Safe-Catch Tuna Lettuce Wraps – grab a can of tuna, mix it with some vinaigrette, throw in diced celery, cucumber, apple, parsley, avocado and pumpkin seeds.
- California Wrap – in a bowl combine black beans, corn, salsa, guacamole, red onion and some roasted red bell pepper. Stir in the juice of one lime and scoop it all into the lettuce.
- Egg ‘Salad’ Wrap – Chop up a couple hard boiled eggs and add in any mix of ingredients you like, I love sun-dried tomatoes, basil, snap peas, hummus, cumin, and asparagus.
- Thai Beef Lettuce Wrap – Save some ground beef from dinner and create the perfect lunch wrap. Mix beef with a little low sodium soy sauce (or coconut aminos), lime juice, scallions, shredded carrots, shredded cabbage, and fresh basil leaves. Add in some freshly chopped mango and cashews and voila… a delicious afternoon delight.

Loving The Leftovers
- Benefits
Leftovers are great! When you start thinking about what to have for lunch, who doesn’t love it when they remember they have leftover food that can just be reheated or repurposed to have a delicious meal? No extra work, no extra dishes!
Scientists have shown that eating leftovers is healthy, for your body, your wallet, and the environment.
- Budget: American households throw away about $640 each worth of food every year. Eating homemade foods is also usually much cheaper than eating at a restaurant or buying processed foods from the market.
- Environment: Food waste makes up more than 20% of what’s in landfills and is a significant source of methane gas as it rots, according to the Environmental Protection Agency.
- Waistline: Meals you make at home are most likely much healthier than anything you’d order at a restaurant or fast food chain.
- Tips
In my opinion, the best way to use leftovers is to turn them into a big hearty salad.
Build a base of mixed greens then add in the leftovers, and complete the well-rounded meal with some nuts/seeds, fruit, and a little salad dressing.
*** What to do if you don’t like leftovers? Try turning the food into a different texture – shred the meat or slice it think like deli meat. Puree veggies and transform them into a soup or scramble grains with eggs for a quick omelet.
'Buddha Bowl' Meals
- What the heck are Buddha Bowls??

Quinoa and pumpkin bowl. What the heck is a Buddha Bowl?
Essentially, Buddha Bowls (also known as macro bowls or hippie bowls) are colorful, filling dishes built in a large bowl and composed of grains, veggies (raw, sautéed and/or roasted), protein (legumes, tofu or meat), greens and seeds — and to finish it all off, a hearty dressing.
At some point in 2016, every grain bowl transformed itself into a Buddha Bowl. It happened on restaurant menus, it happened on blogs, and it really, really happened on Pinterest. Did everyone turn Buddhist all of a sudden? Not so much. The trend came out of a cookbook called The Buddha’s Diet (I’m not necessarily supporting the book, just giving you info). Tagged “The Ancient Art of Losing Weight Without Losing Your Mind,” the book focuses on our culture’s fascination with mindfulness and eating.
Food for Buddha was very low-key, he was actually very thin. (Those chubby statues you see in Chinese restaurants are of a monk who lived a thousand years later.) The key was to keep food in its place. He didn’t want food to take over our whole life.
There’s no ‘one way’ to make a Buddha Bowl, and that’s the beauty of them. You can design your own bowl, filling it with ingredients and flavors you like. Play around with different spices, herbs, and dressings to help find the combination that works for you.
My best advice: Keep it simple AF and bam: suddenly, you’ll be eating like Buddha, too.
- How To Make A Buddha Bowl
- Step one: Cook your grain (or starch)
- Grains are high-fiber foods that come in various forms, including barley, oats, rice, rye, spelt, barley, millet, quinoa, buckwheat, and amaranth.
- Along with fiber, grains provide complex carbohydrates, protein and a wide range of vitamins and minerals, including B vitamins, iron, vitamin E, zinc, magnesium, and phosphorus. It’s for these reasons that grains make an excellent addition to Buddha Bowls.
- The first step in making a ‘bowl’ is to cook your grain of choice. Depending on your taste and intolerances, the best options to go for are quinoa, brown, red or black rice, millet or buckwheat.
- Simply cook as per the packet’s instructions, and head to step two while it’s cooking away.
- If you’re doing potatoes or squash, you can roast those one one sheet pan with your veggies in the next step.
- Step two: Roast your veggies
- To make your Buddha Bowl extra filling, roast your favorite veggies for adding in. Brussels Sprouts, bell peppers, onion, and zucchini all work well.
- To add flavor to your roast veggies, before roasting, sprinkle the vegetables with spices like ground cumin, turmeric, coriander, chili, cinnamon, garlic powder, and paprika. Drizzle with avocado oil as well.
- Roast your veggies at the same time the grain component is cooking, so the elements are cooked and warm at once.
- Step three: Cook protein and extra veggies
- While the grain and veggies are cooking, get started on sautéing the rest of the cooked ingredients.
- If you’re including tofu, meat or tempeh as your protein, fry those up and keep them warm in aluminum foil.
- If you’re including other veggies like sautéed mushrooms, zucchini, broccoli, kale or spinach, now is a good time to do this. Sauté your veggies in some oil and, crushed garlic, herbs and spices.
- Step four: Prep raw ingredients
- To add freshness to your bowl, cut up tomatoes, avocado, cucumber, or carrot — the choice is yours. You can even include seasonal fruit like mango, berries, grapes, and apple. Have these ready for assembling.
- Step five: Assemble
- With your grains, roast vegetables, protein, sautéed and raw veggies ready to go, now is the fun part.
- Get your favorite bowl (we all know we have one) and start assembling the groups of ingredients in whichever order you prefer.
- Add any other toppings you like — guacamole, roasted chickpeas, hummus, olives, feta (if you do dairy), rinsed canned legumes, nuts, and seeds — and don’t forget the dressing.
- The dressing could be as simple as tahini, or a fancier dressing of tahini mixed with lemon juice, maple syrup, salt, and pepper. Mustard, olive oil and vinegar is another classic.
Now all that’s left is to tuck in and enjoy.
